Back to Labs Content
- Backend
- AWS
- S3
- Lambda
Scalable Video Upload Architecture Using Pre-Signed URLs
Saturday, July 5, 2025 at 8:27:43 PM GMT+8
Handling large video files (e.g., 100MB or more) for uploads can strain backend servers, causing performance bottlenecks, increased latency, and storage challenges. A scalable and efficient solution is to use pre-signed URLs with cloud storage services like AWS S3 or Google Cloud Storage (GCS). This architecture offloads the heavy lifting of file uploads to the cloud, reduces backend load, and ensures secure and optimized handling of large video files. Below is a detailed breakdown of the architecture, including components, workflow, security considerations, and implementation details.
Key Components
Client Application
The client application is typically a mobile app (iOS or Android) or a web application (browser-based) where users initiate video uploads. It is built with frameworks such as React Native, Flutter, or JavaScript-based libraries like React or Vue.js. The client is responsible for requesting pre-signed URLs from the backend, uploading videos directly to cloud storage using these URLs, and notifying the backend upon successful upload completion.
Backend Server
The backend server operates as a RESTful API or GraphQL service, implemented using technologies like Node.js, Python Flask/Django, or Java Spring Boot. It handles authentication of client requests, generates pre-signed URLs using cloud provider SDKs (e.g., AWS SDK, Google Cloud Storage Client Library), and manages post-upload tasks. These tasks include triggering video compression and storing metadata, such as file names, user IDs, and upload timestamps, in a database like PostgreSQL, MongoDB, or DynamoDB.
Cloud Storage
Cloud storage, such as AWS S3 or Google Cloud Storage, provides scalable and durable storage for both raw and compressed video files. It is configured with separate buckets, for example, raw-videos for initial uploads and compressed-videos for processed files. Lifecycle policies can be applied to manage storage efficiently, such as archiving or deleting old files to optimize costs and storage usage.
Compression Service
The compression service is a dedicated component, often implemented as a serverless function using AWS Lambda or Google Cloud Functions. It leverages tools like FFmpeg or cloud-native transcoding services (e.g., AWS Elemental MediaConvert or Google Cloud Transcoder API) to compress videos, reducing file size while maintaining acceptable quality. This service is triggered after a successful upload to process the raw video.
Message Queue (Optional)
A message queue, such as AWS SQS, RabbitMQ, or Google Pub/Sub, can be used to manage asynchronous tasks, such as triggering the compression service after an upload. This decouples the backend from the compression service, improving scalability and fault tolerance by allowing the system to handle variable workloads efficiently.
Content Delivery Network (CDN) (Optional)
A Content Delivery Network, such as AWS CloudFront or Google Cloud CDN, can be integrated to cache and deliver compressed videos to users with low latency. This is particularly beneficial for geographically distributed users, as it enhances video playback performance by reducing latency and improving content delivery speed.
Detailed Upload Workflow
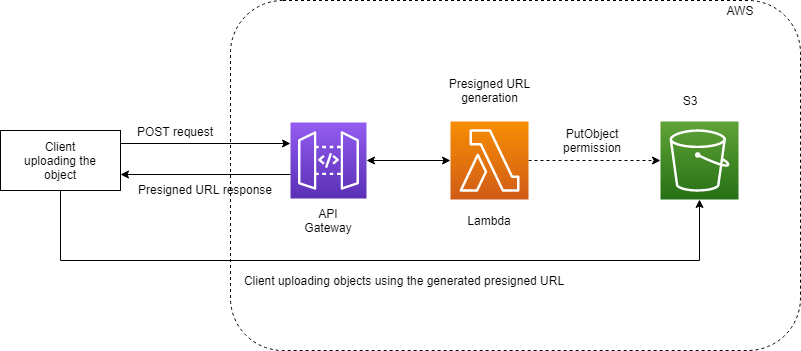
Client Requests Pre-Signed URL
The client (mobile or web app) sends an authenticated HTTP request (e.g., POST /generate-presigned-url) to the backend to obtain a secure, temporary URL for uploading the video. The request includes metadata such as the file name, file type (e.g., .mp4, .mov), and optionally the file size or user ID. Authentication is enforced using JWT, OAuth 2.0, or API keys to ensure only authorized users can request URLs. Example request payload:
{
  "fileName": "user-video-123.mp4",
  "fileType": "video/mp4",
  "userId": "user-456"
}
Backend Generates Pre-Signed URL
The backend uses the cloud provider’s SDK (e.g., AWS SDK for JavaScript, Boto3 for Python, or Google Cloud Storage Client Library) to generate a pre-signed URL. This URL is time-limited (e.g., valid for 5–15 minutes) to enhance security and specifies the target bucket (e.g., raw-videos) and a unique key (e.g., user-456/user-video-123.mp4). The backend logs the request in a database for tracking and validation. Example AWS S3 code (Node.js):
const { S3Client, PutObjectCommand } = require("@aws-sdk/client-s3");
const { getSignedUrl } = require("@aws-sdk/s3-request-presigner");


const s3Client = new S3Client({ region: "us-east-1" });


async function generatePresignedUrl(fileName, fileType) {
  const command = new PutObjectCommand({
    Bucket: "raw-videos",
    Key: `uploads/${fileName}`,
    ContentType: fileType,
  });
  const url = await getSignedUrl(s3Client, command, { expiresIn: 900 }); // 15 minutes
  return url;
}
Backend Sends Pre-Signed URL to Client
The backend responds to the client with the pre-signed URL and any additional metadata, such as the key or bucket name. This allows the client to proceed with the upload. Example response:
{
  "presignedUrl": "https://raw-videos.s3.amazonaws.com/uploads/user-video-123.mp4?AWSAccessKeyId=...",
  "key": "uploads/user-video-123.mp4",
  "bucket": "raw-videos"
}
Client Uploads Video to Cloud Storage
The client uses the pre-signed URL to upload the video directly to the cloud storage service via an HTTP PUT request, bypassing the backend to reduce server load and bandwidth usage. The client can use libraries like axios or fetch in JavaScript, or native HTTP clients in mobile apps. Example JavaScript code:
import axios from "axios";

async function uploadVideo(presignedUrl, videoFile) {
  await axios.put(presignedUrl, videoFile, {
    headers: { "Content-Type": "video/mp4" },
  });
}
Client Confirms Upload
After a successful upload, the client notifies the backend via an API call (e.g., POST /confirm-upload) with details like the key, bucket, and user ID for verification. The backend checks the cloud storage bucket or metadata to confirm the upload. Example confirmation payload:
{
  "key": "uploads/user-video-123.mp4",
  "bucket": "raw-videos",
  "userId": "user-456"
}
Backend Triggers Compression Service (*Bonus)
The backend triggers the compression service to process the raw video by sending a message to a queue (e.g., AWS SQS) with details about the video (e.g., key, bucket). The compression service, such as an AWS Lambda function with FFmpeg, downloads the video, compresses it using settings like H.264 encoding, and uploads the compressed version to a new bucket (e.g., compressed-videos). The raw file may be deleted or archived based on lifecycle policies. Example FFmpeg command:
ffmpeg -i input.mp4 -vcodec libx264 -crf 23 -preset fast output.mp4
Compressed Video Handling
The compressed video is stored in a new bucket or folder, and its URL is saved in the database along with metadata (e.g., file size, duration). The backend updates the database to track the compressed video, which can be served to users via a CDN for low-latency playback. Example database record (MongoDB):
{
  "userId": "user-456",
  "originalKey": "uploads/user-video-123.mp4",
  "compressedKey": "compressed/user-video-123.mp4",
  "compressedUrl": "https://cdn.example.com/compressed/user-video-123.mp4",
  "uploadDate": "2025-07-05T20:08:00Z"
}
Implementation Notes
Pre-Signed URL Security
Pre-signed URLs should have short expiration times (e.g., 5–15 minutes) to minimize unauthorized access risks. Permissions should be restricted to specific actions (e.g., PUT for uploads) and buckets. The backend should use IAM roles with least privilege principles to generate URLs securely.
Compression Service
Use FFmpeg for open-source compression or cloud-native services like AWS Elemental MediaConvert for managed transcoding. Compression settings should be optimized based on the use case, such as lower bitrates for mobile streaming or higher quality for premium users. Example FFmpeg settings for mobile:
ffmpeg -i input.mp4 -vcodec libx264 -b:v 1000k -acodec aac -b:a 128k -vf scale=1280:720 output.mp4
Temporary Storage Strategy
Raw videos should be stored in a temporary bucket with lifecycle policies to delete files after compression (e.g., 1–7 days). For small files (<100MB), in-memory processing in serverless environments can reduce storage costs. Large-scale systems should use dedicated temporary buckets with versioning enabled.
Scalability Considerations
Serverless functions (e.g., AWS Lambda, Google Cloud Functions) should be used for compression to handle variable workloads. Rate limiting on pre-signed URL requests prevents abuse. A distributed database like DynamoDB ensures high-throughput metadata storage.
Error Handling
Implement retry mechanisms with exponential backoff for upload failures. Monitor compression service logs for issues like unsupported codecs. Notify clients of errors via WebSocket or push notifications.
Cost Optimization
Use lifecycle policies to move old videos to cheaper storage tiers (e.g., S3 Glacier). Optimize CDN caching to reduce egress costs. Choose compression settings that balance quality and file size (e.g., higher CRF values).
Benefits of This Approach
Handles Large Files Easily
This architecture allows users to upload large video files (100MB to 10GB) without slowing down or overloading the backend server. By sending videos directly to cloud storage like AWS S3 or Google Cloud Storage, it keeps the system running smoothly even with heavy traffic.
Keeps Uploads Secure
Pre-signed URLs are temporary and restricted to specific actions, like uploading a single file, which prevents unauthorized access. Only authenticated users can request these URLs, ensuring that your videos and data stay safe.
Saves Time and Speeds Up Delivery
Direct uploads to cloud storage reduce the time it takes to send videos, as they don’t pass through the backend. Using a Content Delivery Network (CDN) like AWS CloudFront ensures fast video playback for users worldwide by delivering content from nearby servers.
Reduces Costs
Compressing videos shrinks their size, lowering storage and bandwidth costs. The use of serverless functions for compression and cloud storage with lifecycle policies (e.g., moving old files to cheaper storage) helps keep expenses down.
Works with Many Platforms
This setup supports popular cloud storage services like AWS S3 and Google Cloud Storage, and it handles various video formats (e.g., MP4, MOV) using tools like FFmpeg or cloud transcoding. It’s flexible and fits many types of apps, from social media to e-learning.
Conclusion
Using pre-signed URLs with cloud storage offers a powerful, secure, and cost-effective way to handle large video uploads. It simplifies the process for users, reduces strain on your backend, and ensures fast, reliable video delivery. This architecture is perfect for apps like video-sharing platforms or e-learning systems, especially when users upload from mobile devices with limited bandwidth. By combining cloud storage, compression, and CDNs, it provides a scalable solution that grows with your needs while keeping costs low and performance high.
Another Recommended Labs Content
Imagine standing in line at a coffee shop where each customer needs to fill out a membership form before ordering and then tears it up after getting their coffee. Sounds inefficient, right? This is exactly what happens when your application connects to a database without connection pooling.
Building a Robust Microservices Architecture: From gRPC to Kubernetes
In the ever-evolving world of software architecture, building a robust and scalable system is key to meeting the demands of modern applications. Recently, I had the opportunity to explore a powerful combination of technologies, starting with gRPC, translating it into HTTP/1.1, and finally deploying the system to a Kubernetes cluster. In this blog, I will take you through the journey, share the challenges I encountered, and explain why each of these steps is important for modern software systems.
Imagine you’re hosting a party, and everyone wants to grab snacks from the buffet table at the same time. It’s chaos! Some guests get everything they want, while others leave empty-handed. What if you had a rule where each guest could only take two items at a time? Suddenly, everyone gets a fair share, and your party doesn’t turn into a food fight. That’s rate limiting in a nutshell! But what exactly is rate limiting, and why is it so important? Let’s dive in and explore this concept together.