Back to Labs Content
- Backend
- Software Architecture
- System Design
- Node.Js
- Docker
- Cloud Computing
Building a Robust Microservices Architecture: From gRPC to Kubernetes
Thursday, December 26, 2024 at 7:34:04 AM GMT+8
Why gRPC? Understanding Its Power in Microservices Communication
As we move toward building distributed systems, one of the key challenges is communication between services. In a typical microservices setup, services need to talk to each other to exchange data and process requests. The two most common approaches for communication are RESTful APIs and gRPC.
So, why did I choose gRPC for this project?
What Is gRPC?
gRPC (Google Remote Procedure Call) is a high-performance, language-agnostic framework for communication between services. Unlike REST, which relies on text-based protocols (typically JSON over HTTP/1.1), gRPC uses Protocol Buffers (protobuf) for serialization. This binary protocol is compact, efficient, and designed for high-performance communication, making it ideal for microservices that require fast and reliable data exchange.
Why Use gRPC for Microservices?
- Faster Communication: gRPC’s binary protocol is more efficient than text-based protocols, reducing the overhead of parsing and serialization.
- Cross-Language Support: With gRPC, you can define your service in a language-neutral way and implement it in any language that supports gRPC (like Go, Java, Python, and more).
- Bidirectional Streaming: gRPC supports streaming, which makes it a great choice for real-time communication between services.
However, as much as gRPC is great for communication between services, it’s not as widely supported by clients as HTTP/1.1, especially for web applications. This brings us to the next step in the process: translating gRPC to HTTP/1.1 for broader client support.
Translating gRPC to HTTP/1.1 for Client Communication
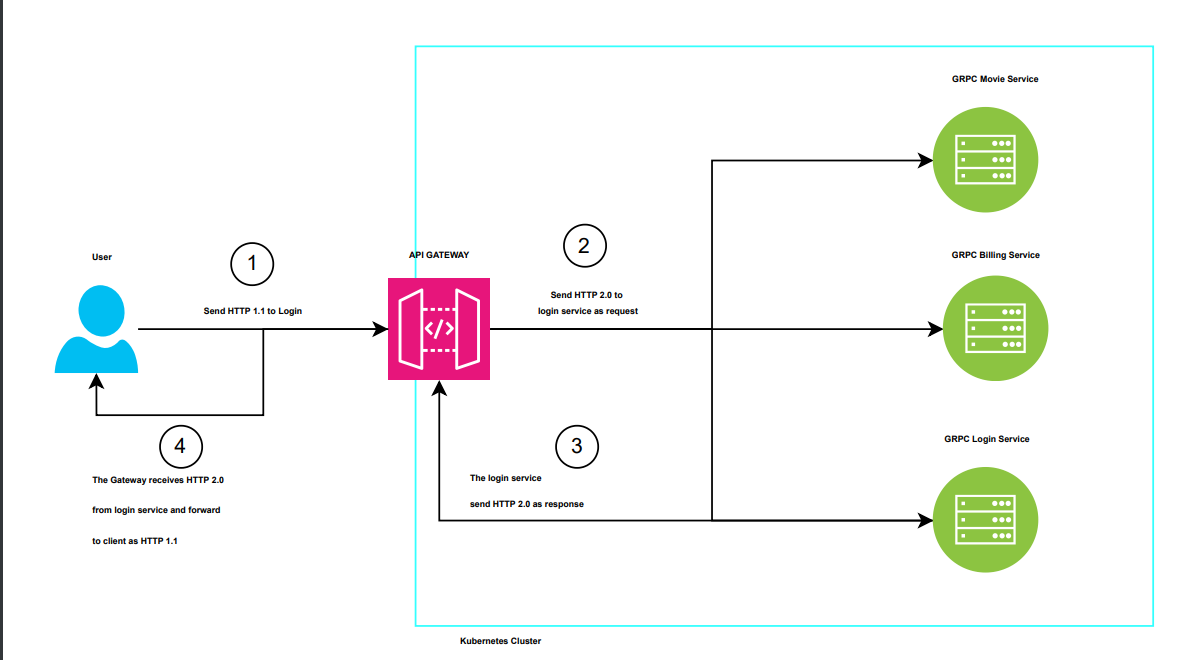
While gRPC is fantastic for internal microservice communication, not all clients can directly communicate with gRPC servers. HTTP/1.1 is still the standard protocol for the majority of web browsers and external client requests. Therefore, I needed to expose the gRPC services through an API Gateway, which would translate incoming HTTP/1.1 requests into gRPC calls.
Why an API Gateway?
An API Gateway acts as a reverse proxy that forwards client requests to the appropriate service, handling routing, load balancing, and security concerns. In my case, it also handled translating HTTP requests into gRPC communication.
- HTTP to gRPC Translation: The API Gateway receives HTTP requests from clients, translates them into gRPC requests, and then forwards them to the respective service. This allows you to expose gRPC services to HTTP clients without changing the core functionality of your services.
- Centralized Control: The API Gateway helps manage cross-cutting concerns like authentication, authorization, rate limiting, and logging, centralizing these tasks for easier management.
What we are going to build for the sample?
 The project starts with the need to create a modern, scalable, and efficient architecture for handling multiple services. You aim to build a system where microservices can seamlessly communicate using gRPC for high-performance, low-latency interactions. The choice of gRPC over traditional HTTP APIs stems from its ability to use Protocol Buffers, enabling efficient serialization, lightweight message exchanges, and bi-directional streaming if needed. This makes it ideal for services like login authentication and movie information retrieval, which require quick and reliable data exchange.
In this project, you plan to create two gRPC services: one for handling user login (grpc-login-service) and another for managing movie-related data (grpc-movie-service). However, since most clients, like web browsers, communicate using HTTP 1.1 or HTTP/2, you introduce an API Gateway as the bridge. This gateway translates HTTP requests into gRPC calls, acting as the central entry point for all client communications. The gateway enables a smoother experience for clients while maintaining the performance benefits of gRPC in the backend.
To host and scale these services, you decide to deploy them on a Kubernetes cluster. Kubernetes provides a robust platform for container orchestration, ensuring that your services are resilient, scalable, and highly available. Your deployment plan includes pushing your service artifacts (Docker images) to the Google Cloud Artifact Registry and then using a 3-node Kubernetes cluster to deploy these services. Each gRPC service and the API Gateway are containerized and defined using Kubernetes YAML files for deployment and service management.
This architecture ensures a clean separation of concerns: each service focuses on its domain logic (e.g., login or movies), while the gateway abstracts communication complexities for the clients. It also leverages Kubernetes to provide automated scaling, load balancing, and fault tolerance, making the system ready for production-level traffic.
Dive to API Gateway
const express = require('express');
const grpc = require('@grpc/grpc-js');
const protoLoader = require('@grpc/proto-loader');
const grpcWeb = require('grpc-web');

// Load .proto files
const loginPackageDefinition = protoLoader.loadSync('login-service.proto', {
    keepCase: true,
    longs: String,
    enums: String,
    defaults: true,
    oneofs: true,
});

const moviePackageDefinition = protoLoader.loadSync('movie-service.proto', {
    keepCase: true,
    longs: String,
    enums: String,
    defaults: true,
    oneofs: true,
});

const loginServiceProto = grpc.loadPackageDefinition(loginPackageDefinition).LoginServiceProto;
const movieServiceProto = grpc.loadPackageDefinition(moviePackageDefinition).MovieServiceProto;

const app = express();
const port = 3000;

// Set up your gRPC client
const login_client = new loginServiceProto('grpc-login-service:80', grpc.credentials.createInsecure());
const movie_client = new movieServiceProto('grpc-movie-service:80', grpc.credentials.createInsecure());

// Middleware to parse JSON bodies
app.use(express.json());

// API endpoint to proxy to the gRPC service
app.post('/api/login', (req, res) => {
    const { username, password } = req.body;

    // Call the gRPC method
    login_client.LoginMethod({ username, password }, (err, response) => {
        if (err) {
            console.error('gRPC error:', err);
            return res.status(500).send({ error: 'Internal Server Error' });
        }
        res.json(response);
    });
});

app.post('/api/movie', (req, res) => {
    const { title, description, rating } = req.body;
    // Call the gRPC method
    movie_client.MovieMethod({ title, description, rating }, (err, response) => {
        if (err) {
            console.error('gRPC error:', err);
            return res.status(500).send({ error: 'Internal Server Error' });
        }
        res.json(response);
    });
});

// Start the API Gateway server
app.listen(port, () => {
    console.log(`API Gateway running at http://localhost:${port}`);
});
This code sets up a simple gRPC server for handling login requests. It begins by importing the necessary modules: @grpc/grpc-js, which provides the core gRPC functionalities, and @grpc/proto-loader, which is used to parse .proto files containing service definitions. The .proto file, login-service.proto, is loaded and configured using the protoLoader.loadSync method. This configuration ensures that field names are preserved, and specific Protocol Buffers types such as long integers, enumerations, default values, and oneof fields are appropriately handled. The loaded package definition is then passed to grpc.loadPackageDefinition to generate a usable gRPC object, which represents the LoginServiceProto service.
Next, the LoginMethod function is implemented to handle incoming login requests. This function receives the call object, which contains the client’s request data, and a callback function to send a response back to the client. It extracts the username and password from the request, constructs a success message, and sends a structured response containing the message and a status field via the callback. The response indicates that the login was processed successfully.
The gRPC server is then created using new grpc.Server(). The addService method registers the LoginServiceProto with the server and links it to the LoginMethod implementation. Finally, the server is started by binding it to the address 0.0.0.0 on port 50052 using the bindAsync method. For simplicity, the server uses insecure credentials, making it suitable for local testing but not for production. Once the server is running, a confirmation message is logged to indicate its readiness to handle incoming requests. Overall, this code provides a robust foundation for handling login operations as part of a microservices-based architecture. It enables fast and efficient communication between services through the gRPC protocol.
Dive to GRPC Service
const grpc = require('@grpc/grpc-js');
const protoLoader = require('@grpc/proto-loader');


// Load the .proto file
const packageDefinition = protoLoader.loadSync('movie-service.proto', {
    keepCase: true,
    longs: String,
    enums: String,
    defaults: true,
    oneofs: true,
});
const MovieServiceProto = grpc.loadPackageDefinition(packageDefinition).MovieServiceProto;


// Implement the ExampleMethod RPC
function MovieMethod(call, callback) {
    const { title, description, rating } = call.request;
    const message = `Thank you for the feedback. The Movie Title is ${title} and the description is ${description} has a rating of ${rating}.`;
    const response = {
        message: message,
        status: 'success',
    }
    callback(null, response);
}


// Create the gRPC server
const server = new grpc.Server();
server.addService(MovieServiceProto.service, { MovieMethod: MovieMethod });


// Start the server
const port = '0.0.0.0:50051';
server.bindAsync(port, grpc.ServerCredentials.createInsecure(), () => {
    console.log(`gRPC server running at ${port}`);
});
This code defines a gRPC server for handling requests related to movies. The server is built using the @grpc/grpc-js library for gRPC functionality and the @grpc/proto-loader library to load the .proto file that defines the movie service. Here's how it works in detail:
First, the .proto file (movie-service.proto) is loaded using protoLoader.loadSync. The protoLoader processes the Protocol Buffers definition into a format compatible with gRPC in Node.js. The options provided during the load process, such as keepCase, longs, and defaults, ensure that the original structure of the Protocol Buffers definition is preserved and mapped appropriately in JavaScript. The loaded package definition is then used to retrieve the MovieServiceProto object, which represents the service described in the .proto file.
Next, the MovieMethod function is implemented as the core logic for handling the gRPC request. This method represents an RPC (Remote Procedure Call) defined in the .proto file. When a client sends a request to this method, it provides details about a movie, such as title, description, and rating. The server responds by constructing a message that acknowledges the feedback and includes the provided details. A response object is created, which contains a message and a success status, and this is sent back to the client using the callback function.
The gRPC server is then created using new grpc.Server(). The addService method registers the MovieServiceProto.service with the server and maps it to the implementation (MovieMethod). This ensures that whenever a request for the MovieMethod RPC is received, the defined function is executed.
Finally, the server is started on port 50051 using the bindAsync method. The grpc.ServerCredentials.createInsecure() method specifies that the server will run without encryption, suitable for development environments. Once the server is bound to the specified port, it logs a confirmation message to the console, indicating that the gRPC server is running and ready to handle requests.
This setup is crucial for your project, as it provides the backend logic for handling movie-related data. It showcases how gRPC enables structured communication between services while maintaining high performance and clear data contracts defined in the .proto file.
Note: There is another grpc service that implemented. and its excluding in this topic. You can create more similiar grpc service like above code.
Creating Dockerfile
To containerize your gRPC service and push it to Google Artifact Registry, you'll use a Dockerfile to define the container's build process and interact with the Artifact Registry to store your container image. Here's how you can approach this process:
The Dockerfile provides instructions for building the container image for your gRPC service. Below is an example Dockerfile for the movie-service:
# Use the official Node.js image as a base
FROM node:16-alpine


# Set the working directory in the container
WORKDIR /usr/src/app


# Copy the package.json and package-lock.json
COPY package*.json ./


# Install dependencies
RUN npm install


# Copy the application code to the container
COPY . .


# Expose the port the gRPC server will run on
EXPOSE 50051


# Start the gRPC service
CMD ["node", "index.js"]
Explanation:
1. Base Image: We use the lightweight node:16-alpine image to reduce the container size while still providing all necessary Node.js dependencies.
2. Working Directory: The WORKDIR sets the container's working directory to /usr/src/app.
3. Copying Files: The COPY instructions add your package.json and the rest of your application files to the container.
4. Installing Dependencies: The RUN npm install command ensures that all required dependencies are installed.
5. Exposing Port: The EXPOSE 50051 makes the gRPC service accessible on port 50051.
6. Starting the Service: The CMD defines the command to run your gRPC service when the container starts.
7. Building the Docker Image
After creating the Dockerfile, you can build the Docker image for your gRPC service using the following command:
docker build -t movie-service .
This command tags the image as movie-service and uses the current directory (.) as the build context.
Note: This Dockerfile only represent single project which refers to one of grpc service. You can create another Dockerfile for another service. which not really different with this one.
Tagging and Pushing to Artifact Registry
This approach allowed Kubernetes (GKE) to seamlessly retrieve and deploy the correct images for each service, ensuring a smooth and reliable deployment process.
To push the image to Google Artifact Registry, follow these steps:
- Authenticate with Google Cloud: Run the following command to configure Docker to use Google Cloud credentials:
gcloud auth configure-docker
- Tag the Image for Artifact Registry: Replace <region>, <project-id>, and <repository-name> with your Artifact Registry details. For example:
docker tag movie-service <region>-docker.pkg.dev/<project-id>/<repository-name>/movie-service
- Push the Image: Push the tagged image to the Artifact Registry:
docker push <region>-docker.pkg.dev/<project-id>/<repository-name>/movie-service
Kubernetes Setup
To deploy your gRPC services to Kubernetes on Google Kubernetes Engine (GKE), you'll go through several steps, including creating the GKE cluster, setting up YAML files for deployments and services, and deploying the services. Here's a step-by-step explanation:
1. Creating a Kubernetes Cluster in GKE
First, you'll create a GKE cluster to host your services.
Step 1: Enable Required APIs
Ensure you have the GKE and Artifact Registry APIs enabled for your project:
gcloud services enable container.googleapis.com artifactregistry.googleapis.com
Step 2: Create the GKE Cluster
Run the following command to create a Kubernetes cluster:
gcloud container clusters create grpc-cluster \
    --num-nodes=3 \
    --region=us-central1 \
    --enable-ip-alias
--num-nodes=3: Creates a cluster with 3 nodes.
--region=us-central1: Specifies the cluster region. Adjust this based on your location.
--enable-ip-alias: Enables VPC-native networking.
Step 3: Connect to the Cluster
To interact with your GKE cluster, fetch its credentials:
gcloud container clusters get-credentials grpc-cluster --region=us-central1
Now, your local kubectl command is connected to your GKE cluster.
2. Preparing Kubernetes YAML Files
You need two types of YAML files for each service: a Deployment file and a Service file.
Example: Deployment YAML (movie-service-deployment.yaml)
This file defines how your gRPC service is deployed.
apiVersion: apps/v1
kind: Deployment
metadata:
  name: movie-service
  labels:
    app: movie-service
spec:
  replicas: 1
  selector:
    matchLabels:
      app: movie-service
  template:
    metadata:
      labels:
        app: movie-service
    spec:
      containers:
      - name: movie-service
        image: us-central1-docker.pkg.dev/<project-id>/<repository-name>/movie-service:latest
        ports:
        - containerPort: 50051
Explanation:
- replicas: Specifies the number of pod instances for the service.
- image: Points to the Docker image in Google Artifact Registry.
- ports: Exposes port 50051, which the gRPC service listens to.
Example: Service YAML (movie-service-service.yaml)
This file exposes your gRPC service within the cluster or to the internet.
apiVersion: v1
kind: Service
metadata:
  name: movie-service
spec:
  selector:
    app: movie-service
  ports:
  - protocol: TCP
    port: 50051
    targetPort: 50051
  type: ClusterIP
Explanation:
type: ClusterIP: Exposes the service within the Kubernetes cluster. Use LoadBalancer if you need external access.
targetPort: Maps the service port to the container port.
3. Deploying the Services
After creating the YAML files, apply them to your cluster.
Step 1: Deploy the Movie Service
Run the following commands:
kubectl apply -f movie-service-deployment.yaml
kubectl apply -f movie-service-service.yaml
Step 2: Verify the Deployment
Check the pods and services to ensure they are running:
kubectl get pods
kubectl get svc
4. Deploying Additional Services
Follow the same process for your login service:
1. Create login-service-deployment.yaml and login-service-service.yaml.
2. Apply the YAML files using kubectl apply.
Conlusion
Building a modern, scalable system is more than just deploying code—it's a journey into the intricacies of microservices, networking, containerization, and orchestration. From the outset, we delved into the necessity of gRPC, unlocking fast, efficient communication between services. By creating two gRPC services. we saw how to design robust servers capable of processing structured requests and returning meaningful responses. Translating these gRPC methods into HTTP/1.1 via an API Gateway expanded their accessibility, making them usable by any client.
Docker came into play as the backbone of portability and consistency, enabling us to containerize and push our services to Google Artifact Registry. With Kubernetes, we embraced the power of orchestration, deploying services on a GKE cluster, ensuring high availability, load balancing, and seamless scaling. YAML files gave us control over deployments, allowing precise management of replicas, ports, and service types. The API Gateway tied everything together, creating a single point of entry for clients while efficiently routing traffic to the respective gRPC services.
This project showcases not just technical implementations but also the thought process behind building scalable, maintainable systems. Each step—from writing the first line of code to testing the final deployment—demonstrates the power of modern tools and practices. It's a reminder of how containerization, orchestration, and thoughtful design transform complex challenges into elegant solutions.
The journey doesn’t stop here. With this foundation, the possibilities are limitless—whether adding more services, optimizing deployments, or exploring advanced Kubernetes features like autoscaling and monitoring. This project serves as a testament to the potential of modern cloud-native development and a stepping stone for future innovation.
So here’s to embracing complexity, simplifying solutions, and building systems that not only work but inspire. The world of scalable systems awaits—where will you take it next?
Another Recommended Labs Content
Understanding Database Partitioning vs Sharding: Concepts, Benefits, and Challenges
When dealing with large volumes of data, efficient database management becomes essential. Two widely used techniques to improve performance and scalability are database partitioning and database sharding. Although often confused, these approaches differ fundamentally in architecture, complexity, and suitable use cases. This article explores these differences in detail, helping you decide which fits your application best.
System Design Simplified: The Trade-Off Triangle You Must Master
Behind every well-architected system is a set of tough decisions. The CAP Theorem simplifies those decisions by showing you what you must give up to keep your system fast, correct, and resilient. Learn how to apply this in real-world architecture.
Why Domain-Driven Design (DDD) Matters: From Chaos to Clarity in Complex Systems
Domain-Driven Design (DDD) is a powerful approach to software development that places the business domain—not the technology—at the center of your design decisions. First introduced by Eric Evans, DDD is essential for developers and architects who want to build systems that reflect real-world complexity and change.