Back to Labs Content
- Software Architecture
- System Design
- Frontend
Why You Need Kubernetes: A Comprehensive Guide
Saturday, November 2, 2024 at 11:48:06 PM GMT+8
In today's rapidly evolving technological landscape, applications are becoming increasingly complex and distributed. To manage this complexity and ensure high availability, reliability, and scalability, organizations are turning to Kubernetes. This powerful container orchestration platform has revolutionized the way we deploy and manage applications.
Why Kubernetes?
1. Simplified Deployment and Management:
- Automated Deployment: Kubernetes automates the deployment process, eliminating manual intervention and reducing the risk of human error. With a few configuration changes, you can deploy complex applications to multiple environments with ease.
- Self-Healing: Kubernetes can automatically detect and recover from failures, ensuring that your applications remain up and running. If a pod fails, Kubernetes will automatically restart it on a different node.
- Scalability: You can easily scale your applications up or down to meet changing demand, without requiring significant manual effort. Whether it's a sudden traffic spike or a planned scaling event, Kubernetes can handle it seamlessly.
2. Efficient Resource Utilization:
- Resource Allocation: Kubernetes efficiently allocates resources (CPU, memory) to your applications, maximizing utilization and minimizing waste. It ensures that your applications get the resources they need, while avoiding overprovisioning.
- Dynamic Scheduling: It intelligently schedules pods onto nodes, optimizing resource allocation across the cluster. This ensures that your applications are always running on the most suitable nodes, regardless of their resource requirements.
3. Enhanced Reliability and Availability:
- High Availability: Kubernetes ensures high availability by replicating your applications across multiple nodes, providing redundancy and fault tolerance. If one node fails, your application will continue to run on other nodes.
- Load Balancing: It automatically distributes traffic across multiple instances of your application, improving performance and reliability. This ensures that no single instance is overwhelmed, and your users get a consistent experience.
4. Increased Flexibility and Portability:
- Container-Based: Kubernetes is container-based, allowing you to package your applications and their dependencies into portable units. This makes it easy to move your applications between different environments, such as development, testing, and production.
- Platform Agnostic: It can run on various infrastructure platforms, including public clouds (AWS, Azure, GCP), private clouds, and on-premises data centers. This gives you the flexibility to choose the best platform for your needs.
Kubernetes Architecture
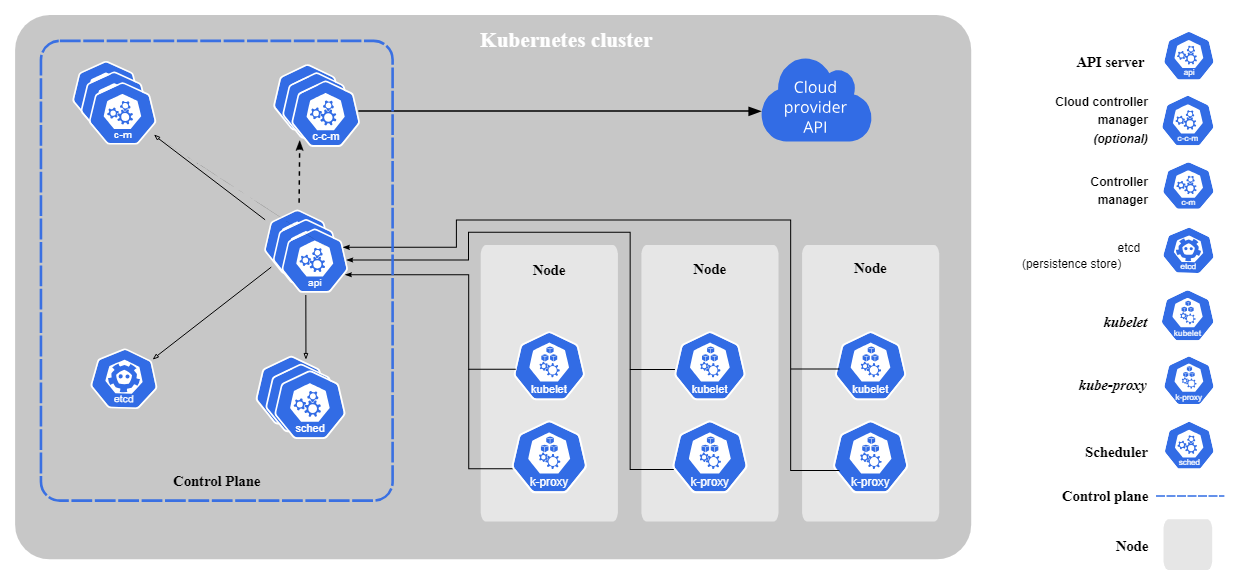
This diagram provides a clear overview of the key components in a Kubernetes cluster and how they interact with each other. Let's break down each component:
Control Plane
- API Server: The main entry point for all interactions with the cluster. All requests (e.g., creating a new pod, scaling a deployment) are sent to the API Server.
- etcd: A distributed, consistent, highly-available key-value store that stores the entire cluster state. All information about pods, services, deployments, and more is stored here.
- Controller Manager: Manages various controllers responsible for ensuring the cluster is in the desired state. Examples of controllers include Deployment Controller, ReplicaSet Controller, and Job Controller.
- Scheduler: Responsible for scheduling pods to available nodes. It considers various factors like resource availability, affinities, and anti-affinities.
Node
- Kubelet: An agent that runs on each node. Kubelet ensures that the containers specified in pod manifests are running on the node.
- kube-proxy: A network proxy that implements network rules for services and load balancing.
Component Interactions
- User or Tool: When you want to create or manage Kubernetes resources (e.g., using kubectl), you interact with the API Server.
- API Server: Receives the request, validates it, and stores it in etcd.
- Controller Manager: Monitors changes in etcd and takes necessary actions. For example, if the number of replicas for a deployment doesn't match the desired state, the controller will create or delete pods.
- Scheduler: When there's a new pod to be scheduled, the scheduler selects the most suitable node and informs the Kubelet.
- Kubelet: Receives information from the scheduler and starts running the pod's containers.
- kube-proxy: Manages networking to ensure traffic is routed to the correct pods.
Deployments: Scale, Update, Rollback
Imagine you have a simple web application (e.g., a Node.js app) running in a Kubernetes cluster. The application is exposed via a Kubernetes Service, and you want to manage it using a Deployment. Here’s how you can implement this:
1. Creating a Deployment
First, you'll create a Deployment to manage your application.
apiVersion: apps/v1
kind: Deployment
metadata:
  name: my-web-app
spec:
  replicas: 3
  selector:
    matchLabels:
      app: my-web-app
  template:
    metadata:
      labels:
        app: my-web-app
    spec:
      containers:
        - name: my-web-app
          image: myusername/my-web-app:1.0
          ports:
- containerPort: 80- Replicas: This specifies how many pods you want to run.
- Selector: This defines how to identify the pods managed by this Deployment.
- Template: This describes the pods that will be created.
Deploying the Application: Apply the Deployment with the following command:
kubectl apply -f deployment.yaml2. Scaling the Application
If you want to handle increased traffic, you can scale your Deployment up or down.
Scaling Up: To increase the number of replicas to 5:
kubectl scale deployment my-web-app --replicas=5Scaling Down: To decrease the number of replicas back to 3:
kubectl scale deployment my-web-app --replicas=33. Updating the Application
When you want to update your application (for example, deploying a new version of the image), modify the Deployment:
spec:
  template:
    spec:
      containers:
        - name: my-web-app
          image: myusername/my-web-app:2.0 # Updated version
Applying the Update: You can update the Deployment by reapplying the configuration:
kubectl apply -f deployment.yamlKubernetes will perform a rolling update, gradually replacing the old pods with new ones.
4. Checking the Update Status
To monitor the status of the update, use:
kubectl rollout status deployment/my-web-app5. Rolling Back an Update
If something goes wrong with the new version, you can roll back to the previous version easily:
kubectl rollout undo deployment/my-web-appTo check the history of the revisions, you can use:
kubectl rollout history deployment/my-web-app6. Verifying the Rollback
After rolling back, you can verify that the previous version is running:
kubectl get deployments
kubectl describe deployment my-web-app
7. Creating a Service
A Kubernetes Service is used to expose your application, making it accessible from outside the cluster (or within, depending on your requirements). Here's an example of a Service configuration:
apiVersion: v1
kind: Service
metadata:
  name: my-web-app-service
spec:
  selector:
    app: my-web-app
  ports:
    - protocol: TCP
      port: 80       # Port on the Service
      targetPort: 80 # Port on the container
  type: LoadBalancer
In Conclusion:
Kubernetes architecture is designed to simplify the management of large-scale containerized applications. By understanding its components and interactions, you can effectively leverage Kubernetes to build reliable and scalable applications.
Another Recommended Labs Content
How to Set Up Push Notifications in Expo with Firebase for Android (Production-Ready Guide)
In this guide, you'll learn how to set up Expo push notifications for Android, including the correct use of Firebase Admin SDK credentials, how to upload them securely, and how to properly configure your Expo app.
Understanding Database Partitioning vs Sharding: Concepts, Benefits, and Challenges
When dealing with large volumes of data, efficient database management becomes essential. Two widely used techniques to improve performance and scalability are database partitioning and database sharding. Although often confused, these approaches differ fundamentally in architecture, complexity, and suitable use cases. This article explores these differences in detail, helping you decide which fits your application best.
System Design Simplified: The Trade-Off Triangle You Must Master
Behind every well-architected system is a set of tough decisions. The CAP Theorem simplifies those decisions by showing you what you must give up to keep your system fast, correct, and resilient. Learn how to apply this in real-world architecture.