Back to Labs Content
- SQL
- Backend
- System Design
- Software Architecture
- API
Building a Simple CQRS Pattern Architecture
Saturday, December 7, 2024 at 9:06:28 AM GMT+8
The Command Query Responsibility Segregation (CQRS) pattern is an architectural pattern used to separate the write (commands) and read (queries) sides of an application. This separation ensures scalability, performance optimization, and flexibility, especially for systems with complex business logic.
This article explains how to design a simple CQRS pattern and implement it in a practical example.
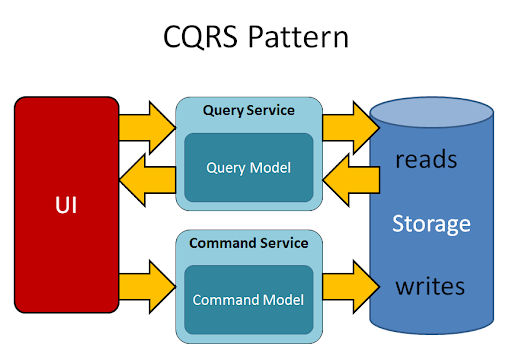
Why Do We Need CQRS?
CQRS is designed to address challenges in systems where the read and write operations have distinct requirements. It is particularly helpful in large, complex applications with high performance, scalability, and maintainability needs. Here’s a breakdown of its importance:
Here’s a detailed explanation of why we need CQRS (Command Query Responsibility Segregation):
Separation of Concerns
In traditional CRUD-based architectures, the same model is often used for both reading and writing data. This can lead to problems such as:
1.Bloated models trying to handle both reads and writes.
2.Tight coupling between read and write logic, making it harder to change one without affecting the other.
Optimization of Reads and Writes
In many applications, the requirements for reading data differ significantly from writing data:
1.Writes may require strict validation, transactional consistency, and complex domain logic.
2.Reads often focus on speed, scalability, and simplicity, potentially requiring optimized or denormalized views of data.
Pre-requisites for this lab:
In this article we will build simple cqrs architecture with apache kafka, elastic search, and the backend service (Express.js).
VM 1: Runs Apache Kafka for handling messaging and event distribution.
VM 2: Runs Elasticsearch for read-optimized data storage and retrieval.
Express.js Services:
A Command service with an endpoint for inserting data into the system.
A Query service to retrieve data from Elasticsearch.
Mysql Database that connected to Express.js service
Planned Architecture
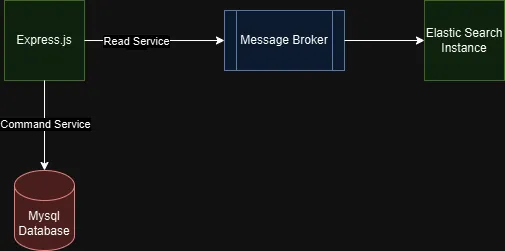
The architecture depicted in your diagram showcases a practical implementation of the CQRS (Command Query Responsibility Segregation) pattern using separate services and data stores for handling write and read operations. At its core, this design focuses on decoupling the responsibilities of updating and retrieving data, ensuring better scalability, performance, and maintainability.
The Command Service, built with Express.js, serves as the entry point for handling all write operations. Whenever a client sends a request to add or update data, the Command Service writes the data to a MySQL database. This database acts as the system's primary source of truth, ensuring the durability and consistency of all data. Once the data is successfully persisted in MySQL, the Command Service publishes an event to the Message Broker, implemented with Apache Kafka. The role of Kafka here is to act as an intermediary that reliably propagates changes across the system, enabling asynchronous communication between services.
On the other side of the architecture, a consumer service listens to the events broadcasted by Kafka. Whenever a new event is received, the consumer retrieves the relevant data from MySQL, transforms it if needed, and indexes it into an ElasticSearch instance. ElasticSearch, being optimized for querying and search operations, ensures that data is structured for fast retrieval. This makes it the perfect choice for systems that need to handle complex queries or search-heavy workloads without compromising performance.
The Read Service, also built with Express.js, provides an API for retrieving data from ElasticSearch. By querying ElasticSearch directly, the Read Service delivers low-latency responses to clients, even under high query loads. This design ensures that the performance of the read operations does not interfere with or degrade the performance of write operations in the Command Service. The use of ElasticSearch also enables advanced search capabilities, such as full-text search, aggregations, and filtering, which are often slow or complex to implement in traditional relational databases.
This architecture embodies the essence of CQRS by segregating the responsibilities of writing and querying data into distinct paths. The Command Service and MySQL handle writes and ensure data consistency, while the Read Service and ElasticSearch are optimized for delivering fast and efficient queries. The inclusion of Kafka as a Message Broker enables asynchronous processing, allowing the system to remain responsive to client requests even when downstream systems take time to process data.
Setting Up Apache Kafka on Ubuntu Server:
In this guide, I’ll walk you through setting up Apache Kafka on an Ubuntu Server running on a virtual machine. While you can certainly use Docker and Docker Compose for a Kafka setup, I decided to go the manual route to test the installation process. So, if you’re ready to roll up your sleeves, let’s dive in!
Step 1: Install Java
Kafka runs on the Java Virtual Machine (JVM), so the first step is to install Java. We’ll use OpenJDK 17 for this:
sudo apt update
sudo apt install openjdk-17-jdk -y
Once installed, you can verify the version with:
java -version
Step 2: Download Kafka
Next, we need to download the Kafka binaries. Use the following command to grab the latest Kafka release:
wget https://downloads.apache.org/kafka/3.6.0/kafka_2.13-3.6.0.tgz
After downloading, extract the archive:
tar -xvf kafka_2.13-3.6.0.tgz
Now, let’s move the extracted Kafka directory to /opt for easier access:
sudo mv kafka_2.13-3.6.0 /opt/kafka
Finally, navigate to the Kafka directory:
cd /opt/kafka
Step 3: Configure Kafka Server Properties
Before we start Kafka, we need to tweak its configuration a bit. Open the server.properties file with a text editor:
nano config/server.properties
Here are a couple of key settings to look for:
- log.dirs: This is where Kafka will store its log files. You can set it to a directory of your choice.
- zookeper.connect: Ensure this points to your ZooKeeper instance. If you’re running ZooKeeper locally, the default setting should work.
Step 4: Start ZooKeeper
Kafka relies on ZooKeeper to manage its metadata, so we’ll need to start ZooKeeper before starting Kafka. Use the following command to get ZooKeeper up and running:
bin/zookeeper-server-start.sh config/zookeeper.properties
To run ZooKeeper as a background process (so you can keep using your terminal), use this instead:
bin/zookeeper-server-start.sh config/zookeeper.properties > /dev/null 2>&1 &
Step 5: Start the Kafka Broker
Now that ZooKeeper is running, it’s time to fire up Kafka. Use this command to start the Kafka broker:
bin/kafka-server-start.sh config/server.properties
Or, to run Kafka in the background:
bin/kafka-server-start.sh config/server.properties > /dev/null 2>&1 &
Step 6: Test Your Kafka Setup
Congratulations! Your Kafka instance is now up and running. Let’s do a quick test to ensure everything works as expected.
- Create a Topic
- Kafka organizes messages into topics. Let’s create a topic named test-topic:
bin/kafka-topics.sh --create --topic test-topic --bootstrap-server localhost:9092 --partitions 1 --replication-factor 1
- List Topics
- To confirm that the topic was created, list all topics:
bin/kafka-topics.sh --list --bootstrap-server localhost:9092
- Start a Producer
- A producer sends messages to a Kafka topic. Start the producer for test-topic:
bin/kafka-console-producer.sh --topic test-topic --bootstrap-server localhost:9092
- Type a few messages in the terminal, and they’ll be sent to the topic.
- Start a Consumer
- A consumer reads messages from a topic. Start a consumer to read messages from test-topic:
bin/kafka-console-consumer.sh --topic test-topic --from-beginning --bootstrap-server localhost:9092
- You should see the messages you typed in the producer terminal appear here!
Part 2: Installing Elasticsearch on a Virtual Machine
Step 1: SSH into Your Server
Connect to your EC2 instance (or VM):
ssh -i /path/to/your-key.pem ec2-user@your-ec2-public-ip
Step 2: Install Java
Elasticsearch also needs Java:
sudo apt update
sudo apt install -y openjdk-11-jdk
Step 3: Install Elasticsearch
wget -qO - https://artifacts.elastic.co/GPG-KEY-elasticsearch | sudo apt-key add -
sudo apt install -y apt-transport-https
echo "deb https://artifacts.elastic.co/packages/8.x/apt stable main" | sudo tee -a /etc/apt/sources.list.d/elastic-8.x.list

sudo apt update

sudo apt install -y elasticsearch
Step 4: Enable and Start Elasticsearch
sudo systemctl enable elasticsearch
sudo systemctl start elasticsearch
Step 5: Configure Elasticsearch for External Access
Edit the configuration:
sudo nano /etc/elasticsearch/elasticsearch.yml
Set these properties:
network.host: 0.0.0.0
http.port: 9200
Restart Elasticsearch:
sudo systemctl restart elasticsearch
Step 6: Verify Elasticsearch
Run:
curl -X GET http://localhost:9200
You should see a JSON response!
Part:3 Explanation of the Express.js POST Route for Inserting User Data and Sending to Kafka
import express from 'express';
import { Kafka } from 'kafkajs';
import mysql from 'mysql2/promise'; // MySQL client for Node.js

const app = express();
app.use(express.json()); // Parse JSON request bodies

// Kafka producer setup
const kafka = new Kafka({
    clientId: 'my-app',
    brokers: ['localhost:9092'], // Replace with your Kafka broker(s)
});

const producer = kafka.producer();

// Connect Kafka producer
async function connectProducer() {
    await producer.connect();
}

connectProducer().catch(console.error);

// MySQL database connection setup
const dbConfig = {
    host: 'localhost',
    user: 'root', // Replace with your MySQL username
    password: 'root', // Replace with your MySQL password
    database: 'user', // Replace with your database name
};

let connection;

async function connectDatabase() {
    try {
        connection = await mysql.createConnection(dbConfig);
        console.log('Connected to MySQL database');
    } catch (error) {
        console.error('Error connecting to MySQL:', error);
        process.exit(1);
    }
}

connectDatabase();

// POST route to insert user data
app.post('/users', async (req, res) => {
    const userData = req.body;

    try {
        // Insert data into MySQL database
        const { name, email, password } = userData; // Assuming user data has 'name' and 'email' fields
        const [result] = await connection.execute(
            'INSERT INTO user (username, email, password) VALUES (?, ?, ?)',
            [name, email, password]
        );

        console.log('User inserted into database:', result);

        // Send the user data to Kafka topic 'user-topic'
        await producer.send({
            topic: 'users-topic', // Replace with your topic
            messages: [
                { value: JSON.stringify(userData) },
            ],
        });

        res.status(201).json({ message: 'User data inserted into database and sent to Kafka' });
    } catch (error) {
        console.error('Error processing request:', error);
        res.status(500).json({ message: 'Error processing request' });
    }
});

// Start Express server
app.listen(3000, () => {
    console.log('Server running on http://localhost:3000');
});
In the given code snippet, an Express.js route (/users) is created to handle POST requests. This route processes user data by first saving it into a MySQL database and then sending the same data to a Kafka topic. Below is a step-by-step explanation of how this route works:
1. Endpoint Definition and Request Handling
The app.post('/users', async (req, res) defines a route that listens for POST requests at the /users endpoint. It uses async/await to handle asynchronous operations such as database insertion and Kafka messaging. The req.body object is used to extract the data sent by the client in the request payload.const userData = req.body;
The userData object contains the user-provided information, typically in JSON format. For example, it might include fields like name. email and password.
2. Inserting User Data into MySQL
To store user data, the route uses a prepared SQL statement to prevent SQL injection attacks. The connection.execute() function interacts with the database, where name, email and passwords fields are inserted into a user table.
const [result] = await connection.execute(
    'INSERT INTO user (username, email, password) VALUES (?, ?, ?)',
    [name, email, password]
);
- Prepared Statement: The ? placeholders in the SQL query are replaced with actual values (name, email, password) safely.
- Deconstructed User Data: The name, email, and password fields are extracted from the userData object for better readability and security.
- Result: The connection.execite() method returns an array, where result contains metadata about the operation, such as the number of rows affected.
If the operation succeeds, a log is generated to confirm that the user data was inserted into the database:
console.log('User inserted into database:', result);
3. Sending Data to a Kafka Topic
After successfully storing the data in MySQL, the route sends the same data to a Kafka topic for further processing. Kafka is often used to handle large-scale distributed messaging and stream processing.
await producer.send({
    topic: 'users-topic', // Replace with your topic
    messages: [
        { value: JSON.stringify(userData) },
    ],
});
- Kafka Producerp: The producer object is an instance of Kafka's producer client, which is responsible for sending messages to Kafka topics.
- Topic Name: The topic field specifies the destination Kafka topic (user-topic in this case). This is where the message will be sent for further processing by Kafka consumers.
- Message Payload: The message array contains the data to be sent. Each message is an object with a value field, which holds the serialized user data (converted to JSON using JSON.stringfy(userData)).
This mechanism ensures that user data is available for other systems (e.g., analytics, logging, or notifications) in near real-time.
4. Response to the Client
If both the database insertion and Kafka message-sending steps succeed, the server sends a 201 Created response to the client with a success message:
res.status(201).json({ message: 'User data inserted into database and sent to Kafka' });
The 201 status code indicates that the request was successfully processed and a new resource was created.
5. Error Handling
The try-catch block ensures that errors during either database insertion or Kafka messaging are gracefully handled. If an error occurs, it is logged for debugging purposes, and the client receives a 500 Internal Server Error response:
catch (error) {
    console.error('Error processing request:', error);
    res.status(500).json({ message: 'Error processing request' });
}
This approach provides transparency to developers and prevents the application from crashing due to unhandled exceptions.
After building the express.js service to insert data in mysql database and message broker. we will create the instance that listening on this producer.
Part 4: Explanation of Kafka Consumer with Elasticsearch Integration
import { Kafka } from 'kafkajs';
import { Client } from '@elastic/elasticsearch';

// Kafka consumer setup
const kafka = new Kafka({
    clientId: 'express-app',
    brokers: ['192.168.128.207:9092'], // Replace with your Kafka broker(s)
});

const consumer = kafka.consumer({ groupId: 'user-group' });

// Elasticsearch client setup
const esClient = new Client({
    node: 'http://localhost:9200', // Replace with your Elasticsearch URL
});

// Kafka consumer processing
async function consumeMessages() {
    await consumer.connect();
    await consumer.subscribe({ topic: 'users-topic', fromBeginning: true }); // Replace with your topic

    await consumer.run({
        eachMessage: async ({ topic, partition, message }) => {
            const userData = JSON.parse(message.value.toString());

            // Insert data into Elasticsearch
            try {
                const response = await esClient.index({
                    index: 'users', // The Elasticsearch index to use
                    id: message.name,
                    document: userData,
                });
                console.log('User data inserted into Elasticsearch:', response);
            } catch (error) {
                console.error('Error inserting data into Elasticsearch:', error);
            }
        },
    });
}

consumeMessages().catch(console.error);
This code demonstrates how to integrate Kafka as a messaging system and Elasticsearch as a search and data indexing tool in a Node.js application. The overall flow involves consuming messages from a Kafka topic and then indexing the received data into Elasticsearch for further use, such as querying or searching.
To start, the script imports two essential libraries: KafkaJS and Elasticsearch client. KafkaJS is a JavaScript library used for interacting with Kafka, which is a distributed streaming platform. The Kafka client allows you to create consumers that can listen to Kafka topics and process the messages in real time. On the other hand, the Elasticsearch client facilitates communication with an Elasticsearch cluster, enabling the ability to store and index documents, which can later be queried or analyzed.
The Kafka consumer is set up by first initializing the Kafka client with a unique clientId (express-app) and specifying the Kafka brokers. These brokers are the Kafka servers where the consumer will connect. The consumer is created with a groupId, which is user-group in this case. The group ID helps manage message consumption across multiple instances of the consumer. When consumers with the same group ID listen to a Kafka topic, Kafka ensures that each partition of the topic is assigned to only one consumer in the group, effectively balancing the load.
Next, the code sets up the Elasticsearch client by specifying the address of the Elasticsearch node (http://localhost:9200). This client will be used to interact with the Elasticsearch service where the user data will be indexed. Elasticsearch is widely used for its powerful search and analytics capabilities, which can handle large volumes of data and provide fast search results.
Once both Kafka and Elasticsearch clients are set up, the consumeMessages() function is created to handle the actual logic of consuming messages from Kafka. This function first connects to the Kafka cluster and subscribes to the users-topic. By subscribing to the topic, the consumer listens for new messages that are published to that topic. The fromBeginning: true option ensures that the consumer starts processing messages from the very beginning of the topic’s log, meaning it will consume all the messages from when it first subscribes, not just new messages that arrive after it subscribes.
The function then uses consumer.run() to begin consuming messages. Each message from the Kafka topic is processed in the eachMessage callback function. Inside this function, the message's value is parsed from a buffer into a JavaScript object (since Kafka messages are typically sent as binary data). The parsed data, which represents user information in this case, is then indexed into Elasticsearch. The esClient.index() method is used to insert this data into the users index in Elasticsearch. A unique identifier for the document is generated using the message's name field. This id ensures that each document in Elasticsearch can be uniquely identified.
If the data insertion into Elasticsearch is successful, a response from Elasticsearch is logged to the console, confirming that the user data has been indexed. If an error occurs while inserting the data, the error is caught and logged.
Finally, the consumeMessages() function is invoked, and any unhandled errors are caught by console.error() to prevent the application from crashing. This ensures that the consumer will keep running and processing messages as they arrive, continuously feeding new data into Elasticsearch for indexing.
Part 5: Wrapup what we have been doing
The architecture discussed in this article aligns well with the CQRS (Command Query Responsibility Segregation) pattern, which is a powerful design pattern that separates the logic of reading data (queries) from the logic of writing data (commands). By implementing Kafka and Elasticsearch in conjunction with MySQL and Express.js, we create a robust system that effectively adheres to the principles of CQRS.
In this architecture, the write operations (commands) are handled by the /users POST route in the Express.js service. When user data is received, it's inserted into the MySQL database and sent to Kafka. Kafka acts as the message bus, decoupling the data-writing process from the read operations and ensuring that data can be asynchronously processed and consumed by different systems or services.
The read operations (queries) are efficiently handled by Elasticsearch. After the data is consumed from Kafka and indexed into Elasticsearch, it becomes readily available for fast and scalable querying. Elasticsearch's ability to index and search large volumes of data makes it an excellent fit for handling query-based operations in this architecture.
By using CQRS, we ensure that the system is optimized for both reading and writing operations, enabling high scalability and responsiveness. Kafka, as the message broker, enables asynchronous communication and allows for horizontal scaling in the system. Meanwhile, Elasticsearch ensures that queries on user data are fast, efficient, and scalable.
This CQRS-based approach also helps with performance optimization, as read and write concerns are handled separately. It allows for the scaling of each part of the system independently, depending on whether there is a higher load on reading or writing. The separation of concerns promotes better maintainability, flexibility, and scalability, making this architecture ideal for modern, high-traffic applications requiring real-time data processing and analytics.
In conclusion, by integrating Kafka, Elasticsearch, and Express.js with a CQRS approach, this system architecture offers a scalable, maintainable, and highly performant solution for handling real-time data in applications where reading and writing data need to be optimized separately.
Another Recommended Labs Content
Understanding Database Partitioning vs Sharding: Concepts, Benefits, and Challenges
When dealing with large volumes of data, efficient database management becomes essential. Two widely used techniques to improve performance and scalability are database partitioning and database sharding. Although often confused, these approaches differ fundamentally in architecture, complexity, and suitable use cases. This article explores these differences in detail, helping you decide which fits your application best.
System Design Simplified: The Trade-Off Triangle You Must Master
Behind every well-architected system is a set of tough decisions. The CAP Theorem simplifies those decisions by showing you what you must give up to keep your system fast, correct, and resilient. Learn how to apply this in real-world architecture.
Why Domain-Driven Design (DDD) Matters: From Chaos to Clarity in Complex Systems
Domain-Driven Design (DDD) is a powerful approach to software development that places the business domain—not the technology—at the center of your design decisions. First introduced by Eric Evans, DDD is essential for developers and architects who want to build systems that reflect real-world complexity and change.